With Valentine's Day coming up, love is in the
air, as they say--and this morning, so is snow.

Forecasted for most of the day, it's coming down
beautifully and turning everything white.

This is my kind of quilting weather!
How about showing snowing down some love in a quilt?

I don't usually do tutorials but making this quilt
is really just about knowing the measurements so,
well, how hard can it be? It practically puts itself
together. And if you've never done an
on-point setting, this is a great place to start.
(This is a good quilt for beginners!)

Whether you use layer cakes or yardage or scraps
is completely up to you but grab some fabrics that
speak to your heart and you can have this
"I Love -----" (fill it in!) quilt top
whipped up in an afternoon.

My 78X78 quilt has 36 hearts but the size can be
adjusted easily, especially if you want to use the
entire layer cake--just add another row.
This layer cake had several pieces that
were too light to show up so I went with 36.
If you run into this issue, perhaps there is a fabric
or two in your stash that might fill in?
You will also need a background fabric. I didn't measure
what I used but it looks like 3 yards should be plenty. I
apologize for not having a more specific amount.
I just pulled from my stash.
By the way, if you need a new rotary cutter,
check out my give-away here for an Olfa Splash!
Border(s) are optional.

Step 1
From each of your 36 layer cake pieces cut:
(one) 8 1/2" X 4 1/2" square
(one) 4 1/2" X 4 1/2" square
Keep the sets together/in order!
(My sets are on the cutting board; the excess is above.)
You will have an approx 5.25" square left from each
that can be cut to 5" charms if you like so it's
a little like getting a free charm pack. I also like
the bonus here that we're not dealing with those
pinked (uneven!) edges.
From your background fabric*, you'll also need
(36) 4 1/2" X 4 1/2" squares

Step 2
Sew one background square to the top of the
themed square, paying attention to the
direction of the fabric if it has one.
Press seam down toward the themed fabric.

Step 3
Sew the coordinating rectangle to the left of the squares.
Again, pay attention to the direction if there is one.
Remember you'll be turning these on-point so choose
the same direction for all directional prints.

And that's it! Your block is done!
Not all of mine lined up this well but they should
for the most part.
Now from your background cut:
(25) 8 1/2" X 8 1/2" squares
Next, cut the setting triangles from the background.
The 8" finished block size below--that's us.

Out of your background cut:
(2) 6 5/8" X 6 5/8" squares, cut once diagonally
to result in 4 triangles
(5) 12 5/8" X 12 5/8" squares cut diagonally twice
to result in 20 triangles
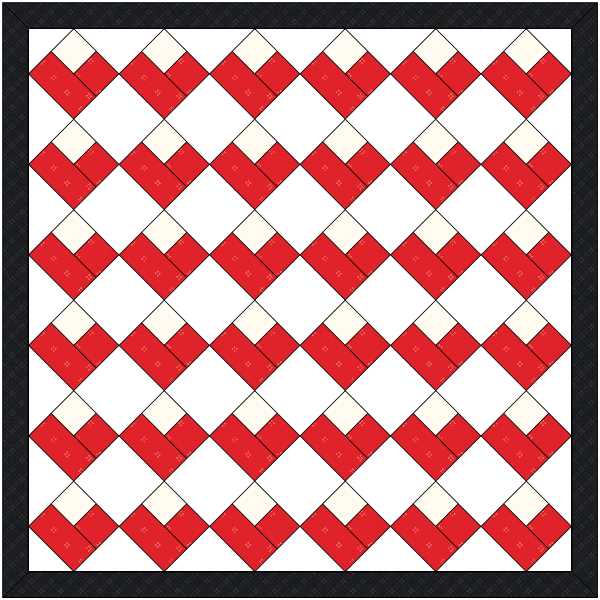
Lay your blocks and setting triangles out
according to the the above EQ8 diagram
(ok, I do have that program)
Sew up your rows diagonally. I pressed my seams toward
the background squares for the least amount of bulk.

(example from a different quilt)
Tip: when attaching the corner triangles, I press a
little crease in the center of the triangle and on the piece
I'm sewing it to. Lining up these creases up gives me a
perfectly centered corner triangle.

If you need help piecing these rows, please see
A little tip I learned recently about sewing on the bias:
When sewing your setting triangle to a block, keep the
triangle piece on the bottom. The feed dogs are better
at moving that bias edge through without pulling on it
than our hands are. This is also good to keep in mind
when sewing any bias edge.

You can add one or more borders, or no border.
I chose to put a small background border around it first
so that those hearts would float a little--I didn't want
them running into the next border.
Then I finished it off with this black border, the same
our bed to try to tie those two together a little better
since I want them to be buddies.
Some readers and friends have been interested in
this quilt so I wanted to share how I made it.
(I also wanted to get it down for my own easy
reference should I decide to make it again.)
I hope this is helpful. I am new to making tutorials
so please let me know if something isn't clear.

Happy quilting, and don't forget to enter to
*I used a different white fabric in my heart blocks but I do
recommend using one background fabric throughout
to help those hearts stand out.
Linking up today to:
Comments
Thank you for linking up with Creative Compulsions!
Michelle
http://mybijoulifeonline.com